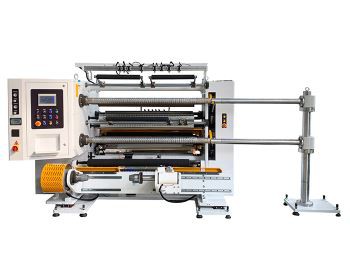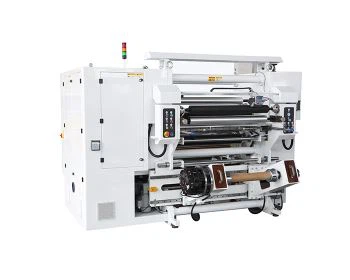
If you've ever run a plastic films roll slitting machine, you know how much of a fine balance it is to hit the sweet spot-too loose a slitter setting, and you get crooked edges or wrinkled film; too tight, and you end up with broken rolls, wasted material, and lost time. As someone who's spent years working with slitting machines (I'm from a company that supplies these, so I've seen every mistake first-hand), optimizing slitting parameters isn't just about tech specs-it's about tuning the machine to your specific film, your production goals, and avoiding the headaches that come with off settings. Today, I'm breaking down the stuff that actually moves the needle, no jargon, no fluff, just real tips we've tested with our clients, plus how to match this to the right machine like our BOPP Laminated Film Roll To Roll Slitting Machine that's designed to handle the trickiest slitting jobs out of the box.
First, let's get one thing straight: there's no one-size-fits-all parameter. A thin, stretchy BOPP film acts way different than a thick, rigid PET or PVC roll, so you can't just copy settings from another job. The first big lever to pull is slitting speed-and I know, everyone wants to run as fast as possible, but cranking it up too early is a recipe for disaster. For example, if you're working with a laminated film that's prone to delaminating (super common with BOPP laminates), running the high-speed mode right out the gate will make the layers separate mid-slit, ruining an entire roll. We see this all the time with clients who buy generic high-speed slitter for plastic film and crank the speed to max before adjusting other settings, like tension. Tension control is the unsung hero here-too much tension, and the film stretches then snaps when it's rewound; too little, and it slides around on the rewind core, leading to messy, uneven rolls. For thin films (under 20 microns), we usually tell clients to set unwind tension at 15-25 N and rewind tension at 10-20 N, with a speed ramp that starts at 50 m/min, then increments by 20 m/min every 2 minutes until you hit your target speed. For thicker films, you can bump tension up by 5-10 N and speed up more slowly, to let the machine adjust to the new load.


Next up: the slitting method and blade type. Most people don't realize this is half the battle-you can have perfect tension, but if your blade is dull or the wrong type, your cuts will be ragged. There are two main slitting methods for plastic films: rotary slitting (shear slitting) and score slitting, and picking the right one depends on your film. Rotary slitting uses two circular blades that shear the film between them, great for thick, rigid films like PET, but for thin, stretchy films like BOPP or PE, score slitting is better-it uses a top rotary blade and a bottom anvil roll, scoring the film so it doesn't stretch. If you're slitting BOPP laminated film, score slitting is non-negotiable (unless you're running extra thick 100+ micron rolls). Dull blades are another common mistake-we have clients who go months without changing blades, thinking "it's cutting, why bother?" but dull blades don't just make ragged cuts, they fray the edges, which leads to wrinkles when the film is used for packaging. The rule of thumb we share is: if you see any tiny burrs on the cut edges, it's time to change the blades. And if you're working with delicate films (like shrink wrap or lamination films), switching to micro-finish blades can make a huge difference-they're sharper and create cleaner cuts without damaging the film.
Then there's rewind tension and core alignment, which is where a lot of new operators slip up. Even if your slitting is perfect, if the rewind is off, you end up with rolls that are lopsided, have gaps between layers, or "bird's nests" when you unroll them later. Core alignment is super simple to mess up-if the core isn't perfectly straight along the rewind shaft, one side of the roll will be tighter than the other. We recommend using a laser alignment tool (most modern slitting machines come with this, but if you have an older one, it's worth buying a $50 tool) to line up the core before starting a job. For rewind tension, it's not a fixed number-it should adjust as the roll gets bigger. When the roll is small (first 100 meters), tension is lower, then it increases as the roll grows, so the outer layers don't slide or warp. This is called "tension taper," and machines like our Vertical Plastic Film Slitting and Rewinding Machine have built-in auto-tension taper that takes this guesswork out. If your machine doesn't have that, you can manually reduce rewind tension by 2-3 N every time the roll diameter increases by 50 mm, which works for most jobs.
Wait, also-web guiding, I almost forgot this. If the film is wandering side to side as it goes through the slitter, your slitting lines will be crooked, and you'll have to throw away half the roll at the end. Web guiding systems adjust the position of the film in real-time to keep it centered on the slitter blades. There are two types: edge guiding (which follows the edge of the film) and line guiding (which follows a printed line on the film, great for pre-printed rolls). For most plain plastic films, edge guiding works fine, but if you're running pre-printed film (like for snack packaging), line guiding is better because it accounts for any stretch in the film from printing, which the edge guiding might miss. A lot of cheap slitting machines skip web guiding, so if you're dealing with that, you can set small guide rolls on either side of the film to keep it straight, but it's not as consistent as an auto-guiding system.
Now, let's talk about specific examples, because this is where it gets real. Last quarter, we had a client who was slitting 25 micron BOPP film for food packaging, and they were wasting 10% of every roll from crooked cuts and broken rolls. They were using a generic high-speed slitter for plastic film, no auto-tension taper, and their blades were the standard ones, not micro-finish. We walked them through switching to score slitting, setting unwind tension at 20 N, rewind tension taper that starts at 15 N and goes down to 10 N as the roll grows, and changing to micro-blades. They also upgraded to our High Speed Bopp Slitting Machine which has built-in web guiding and auto-tension. The result? Their waste dropped to 2% max, and their production speed went up 15% because they weren't stopping to fix broken rolls every hour. Another client was slitting thick 120 micron PET film for industrial packaging, and they were having issues with ragged edges when slitting into narrow strips (10 mm wide). We recommended rotary slitting instead of score slitting, increased their slitting overlap by 0.1 mm (that tiny adjustment made all the difference), and their narrow strips went from 20% defective to almost zero.
Common mistakes to avoid, just so you don't have to learn the hard way. First, not testing settings on a small test roll before running a full production roll. We always tell clients to cut a 50-meter test strip, check the edges, tension, and roll alignment, then tweak before doing 1,000 meters. Second, ignoring environmental factors-if your factory is super humid, plastic film absorbs moisture, which makes it stretchy, so you need to lower tension by 5-10 N to adjust. If it's dry, static electricity becomes a problem, so adding an anti-static bar near the unwind can prevent the film from sticking to itself or the slitter blades. Third, mixing up blades for different jobs-using blades meant for thick film on thin film will crush the film, and vice versa. We keep a stock of different blade types for our clients, just to make this easier.
Another thing: if you're just starting out, or have a mix of film types (some BOPP, some PET, some PE) to slit, a versatile machine is key. Our Plastic Flim Slitting and Rewinding Machine is built to handle multiple film types, with adjustable slitting methods and tension settings, so you don't have to retool everything every time you switch jobs. A lot of small operators buy a machine that only does one film type, then end up having to replace it a year later, which is a huge waste of money.
Let's recap the quick optimization checklist, so you have something to reference next time you run a slitting job:
- Match slitting method to film: Score slitting for thin/stretchy films (BOPP, PE), rotary for thick/rigid films (PET, PVC).
- Set tension based on film thickness: Thin = lower tension, thick = higher tension, use taper as rolls get bigger.
- Change blades regularly: Check for burrs on cut edges-if you see them, swap blades.
- Align cores and use web guiding: No crooked slits, no lopsided rolls.
- Test on a small roll first: Avoid wasting full production rolls on bad settings.
At the end of the day, optimizing slitting parameters isn't about being a machine expert-it's about paying attention to how your film behaves, making small, incremental tweaks, and using a machine that gives you the flexibility to adjust (not just a one-setting machine). If you're still dealing with waste or slow production, or if you're looking to upgrade your machine to make this process easier, feel free to reach out and talk through your specific needs. We've helped dozens of operators cut waste and boost speed by tuning both their parameters and their equipment, and we can help you too.