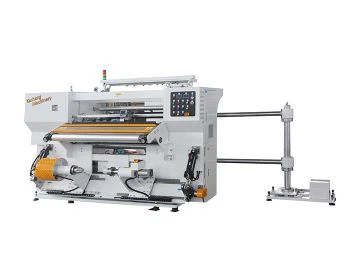
If you run a small manufacturing operation that processes web materials like plastic film, paper, or thin fabric, you know firsthand how tricky a small slitting machine can be. One of the most critical-and most often misunderstood-adjustments you'll ever make is slitting tension. Too much tension, and you'll end up with stretched, warped, or even broken material. Too little, and your slits will be uneven, with loose, wrinkled edges that ruin rolls before they ever make it to your customers. As a supplier of small slitting machines, I've walked new operators through this adjustment hundreds of times, and today I'm breaking down the science (and the practical tricks) to get it right.
First, let's start with the basics: what slitting tension actually is. Tension is the force applied to the material web as it moves through the slitter, held between the unwind stand (where the large parent roll sits) and the rewind stand (where the slit finished rolls collect). The goal is to keep that force consistent across the entire width of the web, and matched to the material you're processing, right down to the smallest details. For example, if you're running thin plastic film, even a 5% difference in tension between edges can cause misaligned slits that lead to customer returns. That's why getting this adjustment correct isn't just a small tweak-it's the difference between a good run and a frustrating, waste-heavy day on the shop floor.
Before you even touch any tension knobs or dials, you need to gather the right info about your specific job. I always tell customers this step is non-negotiable, because one size never fits all in slitting. First, confirm three key factors: the type and thickness of your material, the width of your parent roll, and the desired width of your finished slit rolls. If you're working with plastic film, for instance, a thin polypropylene film will require much lower tension than a thicker polyester film. This is where matching your machine to your material pays off. If you're investing in a slitting machine for plastic film, our line includes options like the Automatic Slitting Machine, which comes with pre-calibrated tension sensors tailored to common film types, but even these need on-the-fly adjustments for each new job.
Another key pre-adjustment check is your machine's baseline tension specs. Every small slitting machine has a rated tension range, usually printed in the operator's manual, that's tied to motor power, brake type, and roll size. For example, a small tabletop slitter for thin films might have a range of 0.5 to 5 Newtons per millimeter of web width, while a slightly larger model for jumbo rolls can handle up to 15 Newtons. If you try to set tension outside this range, you risk tripping overload protectors, wearing out brake components prematurely, or damaging the material.
Now, let's get to the actual adjustment process. I've found that the best method works in three stages: unwind tension setup, slitter station tension, and rewind tension sync. Let's walk through each step step-by-step, with practical tips I've picked up from working with small operators.
First, unwind tension. This is the force pulling the parent roll off the unwind stand, keeping the web tight before it reaches the slitting blades. The biggest mistake new operators make here is setting unwind tension too high at the start of the roll, then letting it drop too low as the roll gets smaller. That causes the web to stretch when the roll is large, then go loose when it's small-leading to inconsistent slits. For small slitting machines, most use either manual brake controls or simpler automatic brake systems, not full closed-loop sensors like larger industrial slitters, so you have to adjust gradually. Start by mounting your parent roll loosely on the unwind shaft, with the edge of the film hanging straight down. Turn the unwind brake adjustment knob slowly until the web stops sagging between the unwind and the first guide roller. Then, check the web flatness: if there are wrinkles, you're too tight (or the guides are misaligned, but that's a separate issue). If it sags, you need more brake tension. For plastic film, a good rule of thumb is to set unwind tension to about 20-30% of the rewind tension we'll set later-this keeps the web tight but not stretched. If you're working with jumbo plastic film rolls, like those handled by our Plastic Film Jumbo Roll Slitting Machine, you'll want to double-check the unwind tension every 500 feet of slitting, since the changing diameter of the parent roll will affect tension.
Next, the slitter station tension. This is the tension between the unwind and rewind stands, across the actual slitting blades. This is where most small operators slip up. The slitter's blades don't do their job correctly if the web isn't held at the right tension here. Too much tension, and the blades will stretch the film, leading to uneven cuts and narrow finished rolls. Too little, and the web will waver, causing ragged edges. The key here is to set tension evenly across the entire width of the web. I always recommend using a tension tester-many small slitters come with a basic portable tension gauge that clips to the web. For thin optical film, for example, you'll want to hold the gauge 10 feet after the slitter blades, in the middle of the web, and adjust the slitter's idler rollers or intermediate brake until the gauge reads 1-3 Newtons per millimeter. For thicker polyester film, that number jumps to 4-7 Newtons. Our High Quality Polyester Film Slitting Machine has built-in intermediate tension control to simplify this step, but even with that model, you'll need to test tension with a few feet of scrap material before running a full job.
The third stage is rewind tension. This is the force winding the slit rolls onto the rewind shaft, and it's where consistency is most critical. The goal here is to wind the rolls tight enough that they don't shift during handling, but not so tight that the inner layers of the roll get crushed or stretched. A common trick here is to set rewind tension slightly higher than unwind tension-usually 30-50% higher, depending on the material. For thin plastic film, this means rewind tension around 5 Newtons per millimeter, while thicker film might be 8-10. It's also important to adjust rewind tension as the finished roll gets larger. When the roll is small, use lower rewind tension, then gradually increase it as the diameter grows. This prevents the inner layers from being compressed. Some automatic slitting machines, like our Automatic Slitting Machine, do this automatically with closed-loop sensors, but manual small slitters will need a small increment adjustment every time the roll diameter increases by a few inches.
Once you've made these three adjustments, you need to test and validate. Even the best setup can have small quirks depending on your specific material and machine. Run 100-200 feet of scrap material through the slitter, then stop and inspect three things: edge quality, web flatness, and roll tightness. If the edges are ragged, your slitter tension is either too high or too low-you'll need to tweak either the slitter station or rewind tension. If there are wrinkles in the web, check the unwind tension (it's likely too low) or the guide rollers (they might be misaligned). If the finished slit rolls have loose spots, that means the rewind tension dropped as the roll got larger-so you need to adjust the incremental rewind tension increases.


I've seen operators skip this test step and jump straight into full production, only to waste hundreds of feet of material and hours of time fixing problems. For a small business, that's a costly mistake. Let me share a real example from a customer who contacted me last year. They run a small packaging operation, using a basic manual slitter for plastic film. They were getting 15% of their rolls returned because of uneven slits. When they walked through this adjustment process, they realized they had set rewind tension to the same value for the entire run, so the inner rolls were crushed and the outer rolls were loose. After adjusting tension gradually as the roll grew, their return rate dropped to less than 1%. That's the kind of impact getting tension right can have on your bottom line.
Now, let's talk about material-specific adjustments, because this is where a lot of generic advice falls short. Different materials react differently to tension, and if you're running specialty films like optical film, the rules change even more. Optical film, for example, is used in displays and requires perfect dimensional stability-even minor stretching from too much tension can ruin its functionality. Our Optical Film Slitting Machine is designed with low-stretch tension control specifically for these applications, requiring tension levels as low as 0.5 Newtons per millimeter. On the other end of the spectrum, thicker fabric or heavy paper will need higher tension, up to 12 Newtons per millimeter for some applications. For plastic film generally, remember that thinner films (under 100 microns) need lower tension, thicker films (100-200 microns) need moderate tension, and films over 200 microns need higher tension, but always within your machine's rated range.
There are also common pitfalls to avoid when adjusting slitting tension. First, don't confuse tension with speed. Many new operators think faster slitting speed means higher tension, but that's not true-tension is a separate force controlled by brakes and motors, not by how fast the machine runs. Speed only affects tension if you push your machine beyond its rated maximum, which can cause slippage or inconsistent tension. Second, don't forget to check your machine's brake pads or clutches regularly. Worn brake parts can cause tension to drift even if you set it correctly, leading to problems mid-run. For small slitting machines, brake pads should be inspected every 100 operating hours, and replaced when they're worn down to half their original thickness. Third, never adjust tension while the machine is running-wait until it's fully stopped and locked out, to avoid injury and ensure accurate settings.
Finally, as you build experience, you'll develop a feel for tension adjustments. But even with experience, it's always helpful to have the right equipment and support. If you're in the market for a slitting machine that makes tension adjustment easier, our line includes options tailored to small operations, from manual slitters for specialty film like our Optical Film Slitting Machine to semi-automatic models for higher volume jobs. To learn more about which machine fits your needs, or to ask specific questions about adjusting slitting tension for your material, reach out to our team to discuss your requirements.
Adjusting slitting tension on a small slitting machine doesn't have to be a mystery. It's a mix of understanding the basic science of forces, following a step-by-step adjustment process, testing carefully, and matching settings to your specific material. By taking the time to get tension right, you'll reduce waste, improve product quality, and keep your operations running smoothly. For more resources on slitting machine setup and material compatibility, explore our line of equipment designed for precision and reliability, built to support small manufacturers like you.